Now it’s time for the scary bit – actually making the inner. Actually this wasn’t as scary as it sounds, as the method I intended to use was fundamentally the same as for the first attempt last year. I embarked on the build with the hope that I’d make a neater job than last time, but confident that however it went I’d have something I could use.
Some of the steps below don’t have a lot of detail on them, as I’ve already covered them in the original post. I’ve tried here to focus on what’s different, or what’s fundamental.
Approach
The key technical difference on this version of the inner was the zip arrangement at the front – rather than a sideways “V” I opted for an inverted “T” – generally considered to be the connoisseur’s choice. Because of this, and because of the hash I made of the zip first time, I decided to hit the front panel early on, and tackle it while I still had reserves of patience and motivation.

Unlike the first time, I didn’t make a prototype, as I didn’t feel the need. I did, however, draw out the 5 main panels on squared paper and annotated with all measurements, as something to refer to as I worked.

Final Fabric Decisions
In the previous post about design, I mentioned that a few final decisions about fabric were outstanding, pending arrival of the Extremtextil order. When it arrived, I had a good look at the fabric and a feel of its weight and “hand” generally.
I decided that I’d made good choices, and would be going with the new stuff. So the final fabrics were:
- Lower panels (yellow): 40D ripstop nylon from Extremtextil (45 g / m2 )
- Upper panels (orange): 40D ripstop nylon from Extremtextil (45 g / m2 )
- Middle (mesh) panels: 0.9oz Noseeum from Ripstop By The Roll (31 g / m2 )
- Bathtub: PU coated 10,000mmH ripstop nylon from Extremtextil (65 g / m2 )
I was undecided on zips, though. I made sure that I topped up my stocks of YKK #3 and #5 coil zipper so that I could decide at the time. Laying it by the fabric though, I felt that the #5 would work best. Yes, it’s beefier than is really needed, but it’s wider and hence easier to sew, plus it doesn’t look excessive for the size of what I’m making. It’s also the obvious thing to use, as this then leaves the #3 for zipped bags and pouches, for which #5 would be silly. Given the complexities and frustration potential of the zippers, opting for a larger and less fiddly zip could only help.

As well as the fabric, there was some hardware too:
- Corner tieouts: 15mm grosgrain looped through a LineLok 3. Then tied out with 2.5mm dyneema line with a loop of shockcord at the stake end.
- Hanging mechanism: 15mm grosgrain looped through a LineLok 3. 3mm accessory cord from Decathlon with a plastic hook on the end.
- Internal hang loop: 15mm reflective grosgrain.
- Door tiebacks: 1 D-ring and a toggle per door, each attached on a length of grosgrain.
Making the Bathtub
This was made identically to the original one, with some minor modifications.
I cut off a piece of the bathtub material measuring 152cm wide by 278cm long. This was calculated as follows:
- Length: floor length + height of bathtub for each end + seam allowance for each end = 236 + 21 + 21 = 278
- Width: floor width + height of bathtub for each side + seam allowance for each side = 110 + 21 + 21 = 152

Working from a known straight edge on the fabric, I used my cutting mat to straighten the adjacent edge at one corner.
For simplicity this time, I used a quilting square to mark off the 4 corners. This determined the bathtub height and the seam allowance. As the square was 8″, this left a bit more seam allowance than I really needed, but I could trim it down later (which I did do).

I then measured along the short straight edge for 110cm (the width of the bathtub) and drew another square. This then formed the width of the piece I needed.

Now I simply folded the fabric in half using my original straight edge to ensure alignment (with the markings uppermost). I measured half the length of the bathtub (138cm) along the long side from the end of the corner square, and this was my centre fold. I could then cut along the short edge level with the folded under side. I now had a piece the right length. With 3 straight edges the right size, it was then easy to sort out the other long side.
Finally, I marked up the remaining corners with the quilting square and I was ready to assemble.
To form the corners I folded diagonally through each corner square to form a triangle. Here I experimented with these triangles sticking outwards and inwards to decide which I preferred. Originally, my design would have these on the outside and the triangles would then form neat tabs to attach tieouts to. But, as in the original build, I opted for inside corners, meaning that I could embed the tieouts in the seam and keep it looking neat on the outside.

Before proceeding, I made a cut around the edge of the corner to reduce its size to the required 15cm bathtub height – as this wouldn’t be folded down and hemmed like the sides, I didn’t need the seam allowance.
The other thing I wanted to do this time was add some stiffening to the corners to enable the sides of the bathtub to sit vertically more easily. After experimenting with rods, webbing and even just repeated folding of the bathtub fabric, I eventually hit upon the idea of inserting a piece of seatbelt webbing . This needed to be cut into a trapezium to fit, but was decently stiff. I was looking for something stiff, but which wouldn’t break or poke holes in the fabric under repeated folding up of the inner.

Stiffening added, I sewed a basting stitch to hold it in place, as it was too fiddly to do this and insert the tieouts in the seam at once. Then folded down the free end of the triangle to make the triangle symmetrical and stronger.


Then a 25cm piece of 15mm grosgrain, the maximum width that would fit through a LineLok 3, was attached at the top and bottom of the corner seam, with a LineLok 3 attached. I then sewed around all 3 edges of the triangle.
Making the Front Panel
The advantage of the way I did this before was twofold: firstly I could do the back and sides first as practice before tackling the hardest panel; and secondly the way I added the zipper ensured I could get the placement right. It did, however lead to a messy result.
This time, I decided to tackle the problem head on and do the most complex panel first. I tend to lose patience towards the end, and start to hurry, so doing this critical panel first meant I could maximise my stores of patience and concentration. It also meant that if the resulting panel ended up a different size to planned, I could adjust the design on the others to compensate. (Similarly, if I really messed it up, I could scrap the build at that point without wasting materials on the rest!)
As before, the key to getting the front panel right is the zipper placement. The previous method left me with loads of loose ends of frayed fabric to get stuck in the zipper when in use. This time, I resolved to take more care with the zipper, and specifically, install it first – just as if I were making a zipped pouch or similar.
This required a bit of extra work in measuring as I would need to allow for the width of the zipper, plus seam allowance for where the fabric and zipper are joined. I quickly realised that I could achieve this by working on an oversized panel with, say, a double seam allowance all around its outside. Some of this would then get eaten in the process of cutting the zipper gaps and attaching them. But it also meant I could guarantee myself having a panel at the end of the process which was still bigger than required. All I would then need to do is trim it down to the required size.
Indeed, working with oversized pieces of fabric was very much how I produced the original inner, meaning that I didn’t compound any measuring errors, and cut simply to adjust it to the right overall size at the end of making each panel. This allowed me to make minor mistakes with things like rolling the seams, without affecting the overall product.
As before, symmetry was my friend. I could put the effort into measuring half of the panel, and each fabric piece that went into it, and then simply cut another the exact same size for the other half.
First the yellow bit. I cut out a rectangle. I generally add on 5cm to each dimension for seam allowances (one each side), but learned on the previous build that at the (sloping) sides, a bit extra is a good idea.

Next a piece of mesh wider than I needed. I did this by finding the vertical centre line of the yellow panel, and folding my mesh in half and attaching it along the same centre line. I used the fact that this panel should be symmetrical to enable me to do all the measuring on half the fabric.
With right sides together, I then sewed a basting stitch close to the edge. Turning the now joined pieces right side out, I pressed them down to expose the stitch line and clipped. Then I ran a line of stitching about 1cmin from the edge. This locked away the raw edges from the initial join, to form a French seam. I then sewed the resulting flap down with a third line of stitching (i.e, I top stitched it, in sewing parlance). I oriented the flap so that the solid fabric was always the outermost when doing this.

Next I repeated the above steps with the top, orange, panel. Here I was extra generous with the seam allowance at the top, as experience of the first build was that things go a bit crazy here, when I want to join it all up later.

I added door tiebacks to the front panel – a D-ring and toggle on loops of grosgrain on each side. I attached these at the top of the yellow panel.

Zippers
Having now got a big stripey triangle made up of three horizontal panels, I was ready to insert the zip. First I folded the panel in half vertically (ie along the line of symmetry). Then cut from top to bottom along this line. This is where the vertical zip would go. I cut a length of zipper a few inches longer than the required length and overlapped at top and bottom.

With the panel right side up, and the zipper teeth facing down, I attached the edge of the zipper tape to one side of the panel (essentially this is identical to the basting stitch I did on the solid and mesh panels).
Then opened it up and folded the fabric down to form a straight line overlapping the edge of the zipper tape. I sewed this down and one side was finished.
I then repeated with the other side of the vertical zip.

Next I separated the two sides of the zipper to attach the slider. One side of the excess zipper tape I trimmed a bit off. I then slid the slider onto the longer bit and down to the end of the shorter bit. Then it was a matter of wangling the other side of the zipper through the slider. A bit of cursing later, and it was done.
At this point, it’s key to always be mindful of where your zipper slider is – you do not want it coming off the end of the tape, unless you want to start the process again. (More on this later).

I used the same process to add zippers to the bottoms of the two sides of the front panel. Here I needed to be careful to engineer a gap between the two ends in the middle, and make it as neat as possible.
At this stage I did not seek to sew the bottom of the horizontal zippers onto the top of the bathtub. I’d do that later.
Finally, to finish the zip, I made up a rectangle of fabric and sewed it over the top end of the vertical zipper. The back (inside) of this was also where I sewed an internal hang loop, and attached a LineLok 3 on a loop of grosgrain to poke out the top of the inner to hang it from.
Making the Back Panel
The back panel was made the exact same way as the front panel. Because the back of the inner slopes more than the front in my design, this meant this panel was larger overall, and more cumbersome as a result. (There’s a picture of the finished inner at the end of this post that illustrates this).
So, first, I measured and cut an oversized rectangle of yellow fabric.
Then an oversized rectangle of mesh, and secured it to the centre (symmetry) line of the yellow fabric.
Then I joined them up with a top stitched French seam as before.
Then I repeated the whole process with the orange fabric panel.

Making the Side Panels
The side panels individually were not symmetrical like the front and back, due to the differing angles of slope of the front and back. So I couldn’t use symmetry to measure these out. What I could do, though, was use the fact that these two sides should be mirror images of each other. This saved a bit of time over doing each side separately.
The method of construction for the sides was, however, identical to the front and back. It was just more difficult to measure as I was dealing with a scalene triangle rather than an isoceles triangle. The key to this was to find the perpendicular line from the peak of the side to the base and use this in the same way as the centre line on the front and back – in other words, this key vertical was the line I used to line the three horizontal panels up correctly. But with different horizontal measurements each side of this line.
I didn’t get this quite right, and found at the end that I hadn’t allowed enough extra in one place on each side. Tip: the more an edge of a panel slopes, the more excess you should allow at the side.
The three layers of the side panels were put together the same was as the front and back.


Assembly
First, I decided to trim down the excess seam allowance at the top of the bathtub, and add a simple hem.

I thought for a while about the two options for assembly:
- Join the upper panels together first, then attach the joined up whole to the bathtub in one go.
- Join each side’s base to the bathtub first and then the sides to each other.
With the zip at the bottom of the front panel to consider as well, I decided to stick with the second approach – join each panel to the bathtub first.
Moreover, I joined the panels in the same order that I made them. Front first because of the criticality of getting the zip aligned properly. Here, the line of vertical symmetry from the top of the inner to the base was key. I folded everything in half to get it spaced evenly.
As my horizontal zips ran the full width of the front panel, I could simply attach the zips in the same way I did before.


The three non-zipped panels were then attached using the same top stitched French seam I used to construct the panels themselves. The back could be done using symmetry to get it in the right position, but the sides I had to judge.
With all the panels joined to the bathtub, I then worked on the 4 sloping seams to join the sides to each other. Same method – top stitched French seams. I decided that the “flap” would be sewn down onto the side panels for consistency and to hide any ugliness!
In attaching the sides to each other, I did the first basting stitch using whatever colour thread I had on the machine at that point. For the visible outside (top) stitching I then attempted to colour match the thread to the panels, meaning I did a lot of swapping between yellow, black and orange.

At the top of the inner, things did get a bit untidy, resulting in me squaring off the top. This in turn needed me to redo the hanging loop and LineLok.
With everything done, I zipped it all up, and disaster! The vertical zip came right off the end of the tape. And of course I’d already finished the other end, where the slider would need to be re-attached. After a bit of cursing, I unpicked one line of stitching at the top and cut through the zip to enable it to be re-attached. This done, I then added a new stopper at the top, and set about adding metal stops to the open end of the this zip. I also melted the last tooth on all of the open ends of the zips to prevent more zip accidents. This did leave a bigger gap where the 3 zips met than I’d wanted, so the final thing I did was sew a tab of webbing to stick up from the top of the bathtub, behind the zip “junction”, to cover this gap.
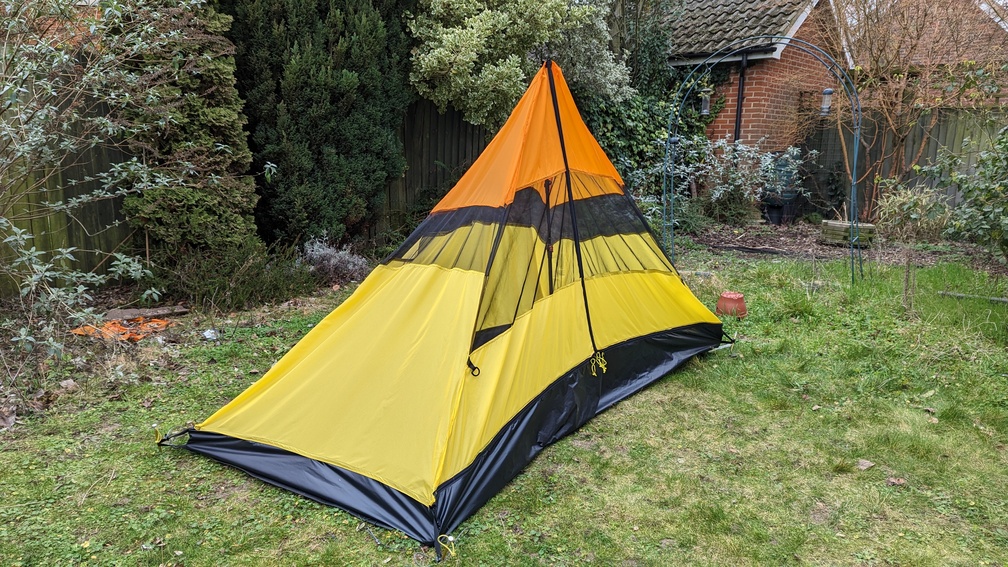
The Finished Inner
Construction done, I added 2.5mm cord to the front corner tieouts (90cm each), adding a loop of shockcord to the end. This proved to only be just enough to reach the tent front corner stakes themselves, but I could easily simply stake these two inner corners if needed. For the rear I went with 60cm tieouts with shockcord loops on the end, and this was enough, albeit also not having loads to play with.
For the hanging, I used 3mm cord through the LineLok and attached a plastic hook to the end – this would go through the small loop inside the peak of the tent to hang the inner from.
I took it out into the garden to pitch and see how successful I’d been. My main concern was whether I’d left enough clearance at the sides – because the tent fly is catenary cut and I was using quite high bathtub sides, I was concerned that the non-catenary cut inner may get too close to the fly. But this proved unfounded – the natural sag of the inner was enough to avoid this. It did get closer when I opened the side vents – because the support rods that keep the vents open, push the fly inwards as well as the vent outwards, but even this was still within a decent enough margin. I was pleased to see that I’d allowed enough solid fabric at the top of the sides so that no mesh was exposed directly by the vents.
Initially the inner didn’t leave as much vestibule as I’d hoped, so I moved it backwards and this was about right. This also slightly improved the sag I’d got on the rear corners, although I also think the tent itself wasn’t level and was leaning backwards slightly. I’ll have a play with this when I test it properly in the field, and if it still sags too much I can add some means of attaching it to the rear tent door tiebacks which should pull it up and out a bit. (The PyraOmms have front and rear doors, but I only ever use the front one, so designed the inner with a single front door, meaning the tent’s rear tiebacks are redundant and hence available for use to support the inner). If this works, I’ll probably do this on the original inner too, as it has the same problem.

Inside the inner was a decent amount of space, which with the sag sorted out should be perfect. Looking at the inner pitched in the garden, I did wonder if I’d still overdone the mesh – testing in the field will tell me this. If need be I can add some solid fabric “curtains”.


Finally, I weighed the completed inner and it came to 694g on my kitchen scales. This compares to 599g for the PyraOmm Duo inner I made last year – a 31% increase in lateral space for a 16% increase in weight. The final weight will go up when I include the stuffsack I’ve yet to make for it, plus the effect of any of the further adjustments I’ve described.
Next…
I’ll be taking the inner to Dartmoor this weekend to give it a proper test with a few nights in cool conditions. As nights are still fairly long, it should be a good test of the “liveability” of the inner. I’ll address the findings from the field test in my next post.

Very impressive
LikeLike